 Looking for ways to enjoy your sprouts? Need direction on how to grow your sprouts? Our new e-Book, Simple Sprouting Recipes is now available as a downloadable PDF. Our recipe book features 15 sprout recipes and directions for growing all types of sprouts from greens to beans. Visit our website to download your copy today.
Tag Archives: raw food
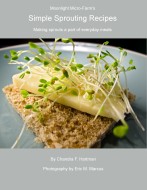
Simple Sprouting Recipes eBook
Easy Fall Plantings

Dwarf Blue Scotch Kale
At the farmers market, I’m often asked, “What’s the easiest thing to plant?”. This is usually from someone who is new to gardening, new to gardening in Florida, or hasn’t had much gardening success. If you want to get started in gardening and are asking the same thing, you’re not alone.
Living in Florida, I love to recommend that new gardeners start in the fall. Planting the right crops in the right season will increase your success rate exponentially and once you have a few growing achievements behind you, you’re more likely to keep at it. Fall is a great time to garden because the weather turns cooler as the season progresses. Bugs and diseases become less of an issue.
The other great thing about fall is the type of crops that can be grown. Most gardeners want to grow tomatoes, peppers, and squash, but the easiest crops to grow are greens. You’re basically eating greens once they pop out of the ground. No waiting for the fruit that can be susceptible to attack by all manner of diseases and critters. Greens grow best in cooler weather. In fact, they thrive when the temperature starts to drop. And although we all love our summer ripened heirloom tomatoes, greens are super nutritious and something we all could eat more often.
Try planting kale, arugula, mustard, lettuce, and Swiss chard. I start from seeds because these are easy to grow and it’s not always easy to find starts this time of year. Greens can be planted successively over the next couple of months. Sow a few seeds now, then again in a week, then the next week, and so forth. This will give you a nice steady supply going into the winter months. These crops are also easy to grow in containers, if you have limited space. You’ll need to keep seeds and soil moist until they have germinated and also keep in mind that the days are getting shorter. Be sure to plant your seeds in a sunny spot.
Get those seeds started now and you’ll be eating your own delicious greens in just a few weeks.
What are you planting this fall?
Sprouted Lentil Dip
I thought it would be fun to share a sneak peek from my new recipe book, Moonlight Micro-Farm’s Simple Sprouting Recipes. Over the last three years, I’ve had many people at the farmers market express an interest in sprouting, but they are either intimidated by the process or aren’t sure how to use them once they grow them. I hope that this book will help demystify the world of sprouting. The e-book should be available in early August with a hard copy to follow shortly after. I’ll keep you posted!
…and straight from the book…
Since lentil sprouts are so quick to grow, I’m always looking for new ways to use them. This recipe borrows from a traditional hummus recipe, without the tahini. The cilantro and lemon brighten the earthy flavor of the lentils and the sun-dried tomatoes impart a warm summertime feel. Alternatively, roasted red peppers could be used. This makes a tasty, healthy, and quick snack.

*photo courtesy of Eric Marcus
Ingredients:
- 2 cups sprouted lentils (green, red, French, or mixed)
- 4 sun-dried tomatoes (packed in oil)
- Juice from 1 lemon
- 1 TB extra virgin olive oil
- 1 tsp tamari or soy sauce
- 1/2 tsp minced garlic
- 1/4 tsp chili powder
- 1/4 cup cilantro, chopped
- 1/4 cup water as needed
- salt and pepper to taste
- paprika
Directions:
Sprout the lentils until they have pleasantly popped open (24-48 hours). Combine all the ingredients in a food processor and puree until smooth. Add the water as necessary to smooth out the texture. Sprinkle with paprika and serve with pita points, sliced vegetables, or on individual pieces of endive.
I have to give my collaborator and husband a big THANK YOU for the awesome photos he took for the book. You can see more of his work at www.emmarcusphotography.com
Katz Inspired Kimchi

***Shared on December 12, 2011 at Food Renegade’s Fight Back Friday’s.
***Photo courtesy of e.m.marcus | photography.
This is the time of year when I love to make kimchi and sauerkraut. A traditional fermented Korean dish, kimchi is made with a variety of vegetables and a mix of spices. I usually like to make Kimchi with Napa Cabbage from Dragonfly Fields, but the cabbages aren’t quite ready yet. I haven’t done any fermenting since spring and was anxious to start a batch, so I decided to make a sort of hodgepodge root based kimchi. I had a discussion with my friend Sheuh-Mei about which style I would make, Chinese or Korean, with her describing the subtle differences. I have to admit, my style of kimchi making is probably best described as Sandorkraut Style, inspired by the self proclaimed fermenting fetishist Sandor Katz. Kimchi is a wonderful source of nutrition: low in calories, high in fiber, rich in Vitamin A, Vitamin B1 & B2, Vitamin C, Calcium, Iron, and beneficial lactic acid bacteria. So, without further ado, here’s my rendition of the season’s first batch of kimchi.


Ingredients I used (basically, what was at hand):
- daikon radish – root and tops (Dragonfly Fields)
- dragon carrots (my garden)
- sweet baby bells (thanks Kevin)
- hot pepper to taste (gift from friend, so not sure what variety)
- 2-3 tablespoons of fresh ginger (my garden)
- garlic to taste
- 3-4 tablespoons of kosher salt (I also use sea salt)
- First, make the brine by mixing the salt with about 4 cups of water or enough water to cover the vegetables. I usually make my kimchi in a 2 gallon food grade plastic bucket because I have a bunch of them, but it can be made in any glass, ceramic, or stoneware container.
- Chop the radish, carrot, and baby bells into bite size pieces. Get creative here. Feel free to add onions, parsnips, burdock, cabbage, or any other vegetables that might be appropriate.
- Put the vegetables in the brine and let them soak for several hours or over night. Be sure they are submerged. I put a plate on top of mine to weigh them down.
- In the meantime, prepare the spices. Grate the ginger. Chop the garlic and the hot pepper. I further grind them together into a paste with a mortar and pestle, but that’s not necessary.
- After the vegetables have soaked, drain off and reserve the brine. You may want to rinse the veggies if they are too salty, but I like mine that way.
- Mix the spices with the veggies and pack them back into the container. I like to pack mine into glass mason jars at this point. I literally pack them in, pushing the veggies down as I fill the jar.
- Pour the reserved brine over the veggies, filling the container. Lightly cover the container, so air can get in, but dust and bugs stay out.
- Set out to ferment on kitchen counter. Be sure to either weigh down the veggies with a plate or water filled plastic baggie, so they are covered with the brine or check the kimchi daily and push the floating veggies back under the brine. I put a plate under the jar to catch any brine that spills over.
- Taste the kimchi every day. It should start to ripen within a day or two. When it is to your liking, cover the kimchi with a lid and refrigerate. It’s ready to eat!


We eat kimchi plain, right out of the jar, but search the internet for other great ways to serve it. Cook it with fried rice, add to stews, serve on top of franks, eggs, or meat dishes, or make into a savory pancake. I just love the way it looks in the jar. Enjoy!

Cabbage Head Sprouts
 Growing your own sprouts or microgreens in the fall and winter is an excellent way to ensure a continual supply of greens when fresh options are limited. Some people consider them to be a superfood. Others claim they are a great survival food. I would simply say, sprouts are nutritious and contain none of the harmful things found in processed food, making them a good choice to incorporate into a whole foods diet. Sprouts grown at home retain their nutrients better than produce that has traveled long distances and sat on a shelf, waiting to be purchased. Sprouting or soaking grains and legumes, greatly increases their nutritional value and digestibility by mitigating the effects of antinutrients. Read the rest of this entry »

